Sep. 14th, 2019

magical_girl_sandbox: Inner Sailor Moon senshi triumphant after another fight. Tuxedo Mask took this picture. (Default)

Lilith HoneyHoney Skin Edits and Defaults


So... many... skins...


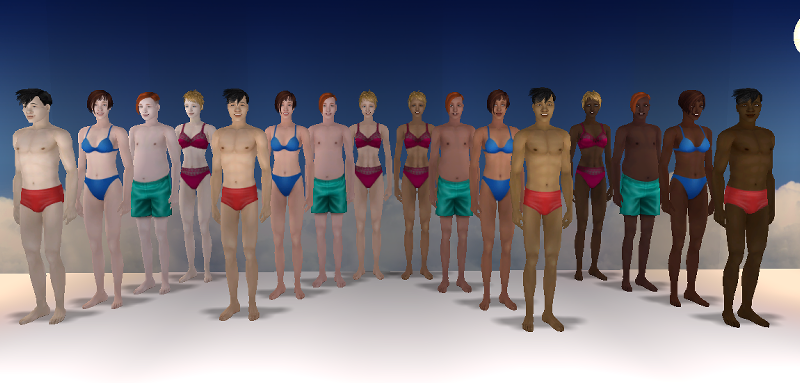
Skin colors from left: Snow White's Coffin, Pale Dust Original, Light Rose Ocher, Warmth Original, Sunkissed Aureolin, Beach Umber, Olive Original, Sunheat Orpiment, Sunset Minium, Moonlit Night Sienna, and Moonless Night Azurite.


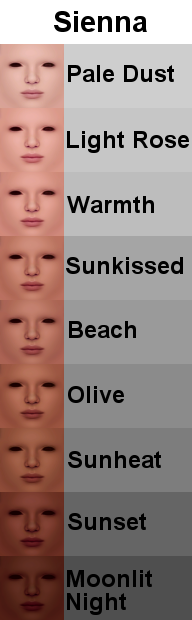
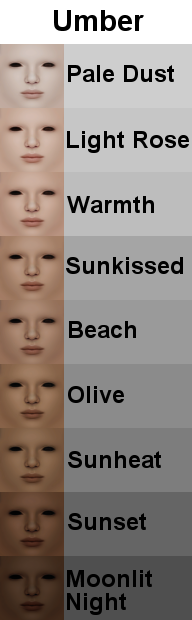
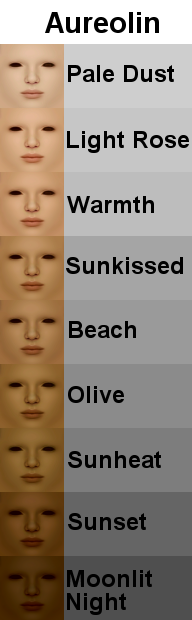
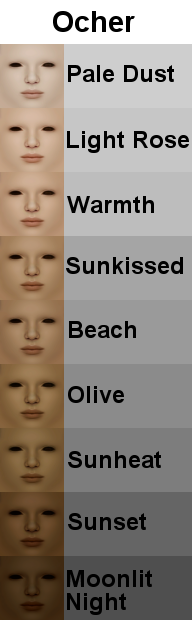
I love the look of Lilith's HoneyHoney skins, so I edited them to work for my sims! First thing: I added a subtly wrinkly face to elders and switched all the teeth to Maxis teeth (and all the eyes to Remi's eyes). I used an overlayed light version of Maxis's wrinkles for this. The "Original" skins are minor edits to Lilith's original versions with 9 of Trapping's skin colors. Next, I made six "tints" for different hues of skin: Sienna -- a bright reddish tone, Minium -- a desaturated red tone, Umber -- a desaturated version of the original colors, Orpiment -- a bright orange tone, Aureolin -- a bright gold tone, and Ocher -- a desaturated gold tone. All of these come in shades equivalent to Trapping's colors: Pale Dust, Light Rose, Warmth, Sunkissed, Beach, Olive, Sunheat, Sunset, and Moonlit Night. I also made three "bonus" colors: a really pale shade using iakoa's "Snow White's Coffin" GIMP color action (found in their "Unreleased Curves"), a non-tinted Trapping's Moonless Night, and a blue-tinted version of Moonless Night (called Azurite). There's a total of 66 skins!!

All of these skins have both female and male-presenting nipples (and elder females' are saggy!), but are barbie below the waist. Files have been geneticized (Each original shade corresponds to an increase of .1, with tints being slightly less or more than the original shade). I also ordered them in CAS and BS and compressorized the files. There's both townified and untownified versions of each skin (but you can't use both at the same time!)


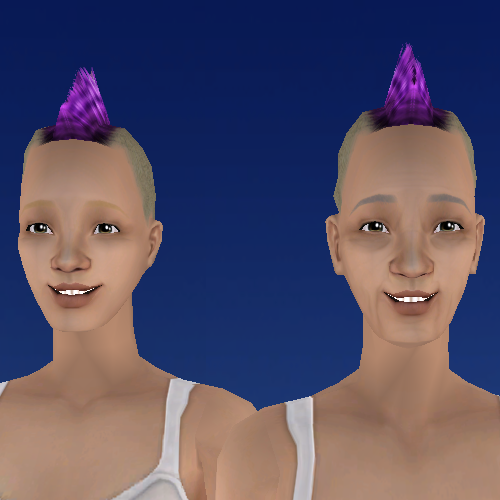
Adult face vs. Elder face

Next are the defaults! One default set is your standard, one shade fits all hairs default. I used Pale Dust for my S1, Warmth for my S2, Olive for my S3, and Moonlit Night for my S4. This is so they'd match up genetically with their corresponding non-default skin (S1 has a genetic value of .1, S2 of .3, and so on). I'm not the biggest fan of the first two skins being so light, but I haven't found a way to change the default genetic values of the original Maxis skins... yet. I also used my new technique for reducing file size and images in skin defaults on these, so they're smaller than they would be otherwise.

Then I made some correlated defaults using Phaenoh's templates. There's two sets: one with the more saturated colors and one with the less saturated colors. All Brown hair skin defaults use the original colors. You can't use more than one default for a hair/skin color combo at the same time, but you can mix and match between sets (i.e. you can have your S1 Red skin from Set 1, S1 Black skin from Set 2, and so on).

Note 8/29/2021: Sims born or created BEFORE you added correlated skins to your game may have a mismatched head color! You can fix this by changing your sims appearances by adding or switching out a full face makeup (you can always remove the full face makeup in a later change appearance session and it will still be fixed).


Correlated skins Set 1: Featuring Orpiment, Sienna, and Aureolin for Blond, Red, and Black-haired sims respectively.


Correlated skins Set 2: Featuring Umber, Minium, and Ocher for Blond, Red, and Black-haired sims respectively.


Downloads:
Original Skins Townified/Untownified
Sienna Skins
Townified/Untownified
Minium Skins
Townified/Untownified
Umber Skins
Townified/Untownified
Orpiment Skins
Townified/Untownified
Aureolin Skins
Townified/Untownified
Ocher Skins
Townified/Untownified
Bonus Skins
Townified/Untownified

Default Skins Standard Set

Correlated Default Skins Set 1
Correlated Default Skins Set 2


Back to Navigation

magical_girl_sandbox: Inner Sailor Moon senshi triumphant after another fight. Tuxedo Mask took this picture. (Default)

Streamlining Skin Defaults – V1.1: 08/09/20


*** Note: This tutorial is for folks who have done skin defaults before and are familiar with SimPe. Check out this tutorial if you are just starting out with defaults!
*** Note 2/Disclaimer: Backup the files you’re working with before starting this tutorial – there’s a chance you can delete the wrong file part and things can get borked.
*** Note 3: This has been done similarly here, but with the TXMTs pointing to the TXTRs for another file entirely (which means you have to have non-defaults for the defaults to work correctly). Mine doesn’t have this requirement, but it’s the same method.

Alright, so I’ve been playing about with skin defaults for the past few days, and I’ve managed to find a way to reduce the number of images you need in your files. Let’s start by taking a look inside a typical skin default file…


You’ve got your TXMTs and your TXTRs. Some skin default files don’t have TXMTs included – if that’s the case, find yourself a different default set to use as a base.

Now consider what image files you are using to build your own default. For my defaults, I had all my ages share a face (except babies and elders), and I had teens (and elder men) share textures with the respective adults. Everybody also shares a hair texture. However, when I look at the TXTRs in this default file, I see that teens have their own bodies and every age has their own face. That seems a bit redundant.

Start fixing this by going into a TXMT. I’ll use amface_s1_txmt:


You’ll notice that under the stdMatBaseTextureName property (Properties tab, Plugin View section) you’ve got a “value” of amface-s1. That’s the name of the TXTR that is being used for adult male sims’ faces. If we want all adults, regardless of gender to share a face, we can set this value to point to the afface-s1 TXTR (it isn’t essential that it be afface, I just chose it because it’s the first face in the list). Simply change amface-s1 to afface-s1 and commit the TXMT.


Next, go into your File List tab. You’ll see amface-s1 there as well, so change that to afface-s1 too, and commit.


Now no TXMT is using the amface-s1 TXTR. You can safely delete it from the file.


Repeat for every age and gender that you would like to have pointing to a different TXTR. Note that there’s a TXMT for tops, bottoms, and full bodies. All three of these will automatically be pointing to the same TXTR. Change all of them if you need to change one! Also note that tfface is already pointing to afface, and there’s no TXTR for tfface (which is how I figured this whole thing out!).


Another note:  if for whatever reason you want to change the name of a TXTR, (idk, I changed my afface, which was being used by all ages to be named uuface) make sure to press fix TGI! You’ll get the dreaded missing texture alphabet soup of doom if you don’t!


Once you’ve set the TXMTs to point to the correct TXTRs, you are set to start importing your image files as normal. Hopefully, this technique will help you reduce redundancy and your file size!

*** Misc. things: You can use this technique with Phaenoh’s correlated skin defaults to a degree. For Blond, Black, and Red hair defaults, everything works pretty much as stated above, just ignore the 3IDRs and all that and remember you don’t have TXTRs for elders. For Brown hair defaults though, this doesn’t work as there’s few TXMTs in the files. I tried creating some, but it didn’t work.

Edit - August 2020: If you go spelunking in the Catalog/3D files, you can sometimes find extra TXMTs to add to the file. Adding them in and then doing the rest of the tutorial as usual will work!
Also confirmed: You can add in extra TXTRs. Don't forget to fix TGI!


Don’t be afraid to experiment!! (after backing up your files!!)


Back to Navigation

magical_girl_sandbox: Inner Sailor Moon senshi triumphant after another fight. Tuxedo Mask took this picture. (Default)

GIMP Hue-Chroma Presets


Nothing too fancy here -- just the tints I used for my giant skin set!

These require GIMP, but you could probably recreate them in other image processing programs since they're so simple. All they do is shift the Hue and Saturation for an image. Not quite on the same level as curves, but they work well for Sims skins. Included is Sienna (saturated red tint), Minium (desaturated red tint), Umber (desaturated tint), Orpiment (saturated orange tint), Aureolin (saturated gold tint), Ocher (desaturated gold tint), and Azurite (blue/purple tint).


New: 4/30/2021 -- Diatomite Tint!

I use this for my blonde hair default on Volatile.

To use: Download the file(s) and extract to somewhere on your computer that you can browse to easily. Open up GIMP, and go to Colors > Hue-Chroma.


Click the little arrow in a box on the far right of the pop-up window. Then choose "Import Current Settings from File".


Browse to where you put the tints, select the one you want, and you're good to go! You can also save your own preset version of the tint in the same pop-up window (click the plus to the left of the arrow in the box). 


Download the skin tints here!
Download Diatomite Hair Tint here!


Back to Navigation

Profile

magical_girl_sandbox: Inner Sailor Moon senshi triumphant after another fight. Tuxedo Mask took this picture. (Default)
magical_girl_sandbox

Most Popular Tags

June 2025

S M T W T F S
12345 6 7
891011121314
15161718192021
22232425262728
2930     

Style Credit

Powered by Dreamwidth Studios